İstanbul,
23°C
açık
If your Windows 10 Task Manager shows 100% disk usage, something is causing your hard drive to over-work. Your computer is now so slow it’s almost impossible to use, and you’re probably wondering what you did wrong. The answer is, nothing! This problem can occur all by itself. But the good news is, it’s usually not a hard problem to fix.
windows 10 100 disk usage 2021, 100 disk usage windows 10, 100 percent disk usage windows 10,
SuperFetch helps to decrease boot time and make must-load programs more efficiently. However, it has been identified as a potential cause of disk performance issues in Windows 8 and later versions of Windows, including Windows 10. Here’s how to stop this service:
1) On your keyboard, press Windows logo key, type command prompt, then select Run as administrator.
2) Click Yes at the User Account Control prompt.
3) The command prompt will once again display. Type in the following command:
4) Hit Enter on your keyboard.
5) If the command above isn’t valid, try the following one instead:
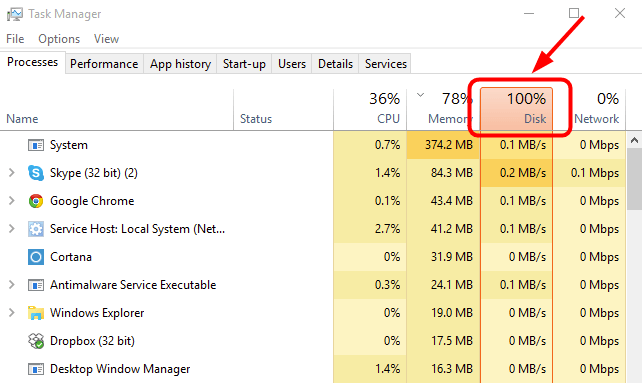
6) Wait for a few minutes to see if your computer starts performing better. Or check your computer’s disk usage: Type “task manager” in the Windows search bar and select Task Manager, then in the Processes tab, look at the % at the top of the Disk column. If it’s no longer 100%, you’ve fixed the problem!
If the 100% disk usage problem persists, try the next method, below.
If the steps above don’t resolve your 100% disk usage problem in Windows 10, it may be caused by a device driver.
You can automatically update all your device drivers to the latest correct version with Driver Easy.
Driver Easy will automatically recognize your system and find the correct drivers for it. You don’t need to know exactly what system your computer is running, you don’t need to risk downloading and installing the wrong driver, and you don’t need to worry about making a mistake when installing.
You can update your drivers automatically with either the FREE or the Pro version of Driver Easy. But with the Pro version it takes just 2 clicks (and you get full support and a 30-day money back guarantee):
1) Download and install Driver Easy.
2) Run Driver Easy and click Scan Now button. Driver Easy will then scan your computer and detect any problem drivers.
3) Click the Update button next to any flagged device to automatically download and install the correct version of that driver (you can do this with the FREE version).
Or click Update All to automatically download and install the correct version of all the drivers that are missing or out of date on your system (this requires the Pro version – you’ll be prompted to upgrade when you click Update All).
4) Check your computer’s disk usage: Type “task manager” in the Windows search bar and select Task Manager, then in the Processes tab, look at the % at the top of the Disk column. If it’s no longer 100%, you’ve fixed the problem!
If the 100% disk usage problem persists, try the next method, below.
Virtual memory can be considered an extension of your computer’s physical memory. It’s a combination of RAM and a portion of your hard drive. When the RAM isn’t enough to perform a task, Windows will temporarily store files in virtual memory, then swap them back to RAM when required.
To reset virtual memory:
1) On your keyboard, press Windows key and Pause/ Break key at the same time. Then choose Advanced System Settings on the left panel.
2) Go to the Advanced tab, then click Settings.
3) Go to the Advanced tab again, and choose Change… in the Virtual memory section.
4) Ensure the Automatically manage paging file size for all drives checkbox is NOT ticked.
5) Select your windows drive (the hard drive or partition that has Windows installed on it – usually C:), and enter an Initial size and Maximum size for your virtual memory:
Once you’ve entered your virtual memory values, click Set, then click OK to continue.
6) Clear all your computer’s ‘temp’ files. On your keyboard, press Windows key and R at the same time, then in the Run form, type temp and hit Enter. This will invoke Windows Explorer with your Temp folder open, showing you all the temp files on your computer.
8) Check your computer’s disk usage: Type “task manager” in the Windows search bar and select Task Manager, then in the Processes tab, look at the % at the top of the Disk column. If it’s no longer 100%, you’ve fixed the problem!
windows 10 100 disk usage 2021, 100 disk usage windows 10, 100 percent disk usage windows 10, 100 disk usage windows 10 fix